

Camp Fire Lighting For Beginners
As anyone who has spent any time in the wild will know, fire is probably one of the most useful tools available to the outdoor adventurer. With a fire you can stay warm, cook food, boil (sterilise) water, keep predators at bay, keep insects at bay, make tools, make medications, signal and so much more.
Different circumstances call for different fire structures and arrangements. Knowing what type of fire works best, in a given situation, can be very useful and potentially life saving.
SO...
The secret to any good fire is the following formula, which is also known as the triangle of fire. For a successful fire, you will need to bear in mind the following elements:
Oxygen+Fuel+Heat = Fire
Without any one of these elements, your fire may be prone to failure. SO, if you are having difficulty lighting or keeping your fire going, please consider the fire triangle.
Choosing a good location for your campfire.
Location is a very important factor when choosing a good spot for a fire or indeed for your campsite in general. If possible, ensure the you are on the leeward side of the place you are camping in (i.e. the wind is blowing away from you, not towards you). Try and dig down to bare soil for your fire site / pit, this will minimise the amount of damp soil, debris and leaf litter that could negatively affect your fire. Always check above and to the sides for "widow makers", large tree boughs or trunks that could potentially crack and fall during damp or windy weather (possibly causing injury or death).

Above - large trunk suspended in the trees that could fall at any time - classic widow maker!
Pay attention to the type of soil you are on. Very peaty or overly root filled soils can potentially be dangerous as underground fires can easily develop and spread. In such conditions, suspending or isolating the fire may be necessary for safety.
So now you have found and prepared your ideal location, let's get that fire started.
To get any fire going, you will need the following physical ingredients:
1 - Ignition source - this can take many differing forms but the most common will be matches, a lighter, fire steel (ferrocerium), magnified solar energy, electrical spark, chemical reaction or some type of friction fire lighting technique (fire drill etc).
2 - Tinder - What you will initially light with your ignition source. This needs to be the finest and driest material you can find. Dried grasses,leaves, sedges, fine wood shavings, seed pods, dried ferns, cramp balls, small twigs etc. I find it's best to collect these on the way to your campsite so they are all ready to go once on location, that way you don't have to go especially out of your way. Once you have found some tinder, if it isn't already dry, try and dry it out in the Sun and then, keep it as dry as possible. Slightly damp tinder can be dried out in a pocket, close to the skin, where the body's heat is sufficient to dry it, over the course of an hour or more. Ideally, a large tinder bundle is recommended as this will give you the highest chance of getting your fire lit.
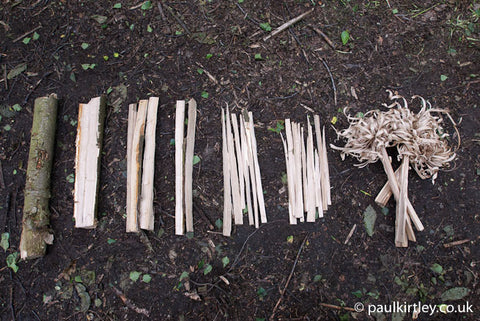
From left to right - Larger boughs (main fuel), smaller split boughs (kindling), feather sticks and shavings (tinder).
Additionally, there are also many good man-made tinders available on the market. These can be stored indefinitely and in my opinion, should always be carried, when going into the wild, just in case conditions do not allow for decent tinder gathering (if it's dark out, for example). The burning tinder is what you will use to ignite the kindling. Once you actually have a fire going, it is then possible to dry out any damp tinder for future fire lighting.
3 - Kindling - Usually consists of medium sized twigs, dried bark and small pieces of wood that have either been batoned or shaved into small slivers. This is a good stage at which to add feather sticks, if you have any. "Feathering" a stick greatly increases the surface area of the wood, meaning it is far more likely to catch alight. Particularly useful when dealing with green wood.
4 - Smaller boughs - Boughs that have been split length ways (batoned) usually up to 50 cm in length. Some pretty serious heat is needed to get these going, especially for green wood, but once you have reached this stage, it would be pretty difficult for the fire to go out unless something disastrous occurred. To ensure easy lighting and cleaner burning, be sure to strip off the bark, as this is where the majority of moisture will be held. The removed bark can be dried by the fire and burnt later, once the fire is properly established.
5 - Larger boughs - Should only be added to a fire that is already very well established (the stage also known as a self feeding fire). These larger boughs will not give off as much heat as split wood, but they will burn for hours, meaning that little attention need be bestowed upon them. If you want a fire that lasts all night, for example, then many, many larger boughs will be needed. A good rule of thumb is, gather how much wood you think you will need to last the night, then triple it!
Personally, I stay up till about 11pm - midnight. If lighting the fire at about 8pm I usually use up about 2 ten foot saplings with a diameter of approximately 15cm / 5 inches. This is for late Autumn / early Winter conditions. Naturally, the amount of wood you require will vary hugely depending upon factors such as ; type of wood used, condition of wood used, how saturated the environment is, how good your shelter is, how many people there are, how cold it is and how warm you need to be.
So, you have gathered your materials and chosen your spot, time to get the fire started but what form should your fire take?
Three useful fire structures.
The traditional camp fire - everyone will be familiar with this set up. It puts out a lot of light and heat and is pleasant to sit around. This set up does need "feeding" regularly to keep it burning at optimal levels, so is fairly labour intensive.

The long fire - Using large, long boughs and trees. The idea of this fire is that it produces a wall of heat that is the same length of your body when lying down. In other words it is designed to keep your whole body warm as you lie next to it. This type of fire is ideal for deep winter conditions, and usefully, is not extremely fuel hungry.

The star fire - This is a good, slow burning fire that is easy to tend but does not put out a huge amount of heat. As the logs burn down, they need to be pushed to the centre. This arrangement is not very labour intensive as the logs do not have to cut down or split but simply pushed closer to the middle of the circle.

The Dakota fire - Interestingly, this was an American Indian technique used to minimise smoke and outward visibility. A 9 inch wide hole is dug into the ground to a depth of approximately 1 - 1.5 feet. Another narrower hole is dug, parallel to the first. Then, a small tunnel is dug to join the two holes. The smaller hole will now act as a chimney which makes for a very efficient burn. The Dakota pit is useful for cooking but not so great for heating.

This is by no means whatsoever an exhaustive list of fire structures but these common types will be useful in most campsites and are a good starting point for your journey into fire making. Try and experiment with various structures to see which ones are of most use to you. Also, you can vary various elements to fine tune your structure.
Good luck and happy camping!

...)